
INTRODUCTION :
___________________________________________________________
___________________________________________________________
Updated 2015 January 04 : see the changelog
I already linked before to many articles showing evidences about global automated privacy violation, automatic recording of everything we do online, as well as our phones, just in case it would be needed for "national interest". We are assumed criminals by default. You have to actively retain your privacy, or it will fade away by itself.
In my last article Defend Your Network And Privacy : VPN Gateway With OpenBSD, I explained how to build a home gateway to encrypt all of your outgoing traffic with OpenBSD. Now I come back with the same, but with FreeBSD 10 this time. There is a lot of advantages in both OpenBSD and FreeBSD, I love both OS.
On OpenBSD I really like the default strong security, the latest great pf, the chrooted by default packages, the rigorous audit of the code, and their work on projects such as OpenSSH and LibreSSL. On FreeBSD, I appreciate the system binary update with freebsd-update and the possibility to rollback, the Jail feature, native multi-core support (SMP), the UFS2 default journaled softupdates (+TRIM support for SSD), and ZFS filesystem support.
There is more to say, OpenBSD life cycle is a new release every 6 months, and support only the n-1 version, while FreeBSD has normal versions being supported one year, and extended versions supported two years. On the other side, OpenBSD runs by default at securelevel 1 which is secure, while FreeBSD is at securelevel -1 (which can be modified obviously). OpenBSD has many memory protections enabled and encrypt swap by default, while FreeBSD does not enable them all by default (stack guard not enabled, swap not encrypted). I'm sure both have other strong points, I apologize for not being exhaustive.
Obviously, both are great OS and can be used to achieve identical goals, such as building a home gateway. If you need SSD TRIM support, system binary update and rollback, Jails, or ZFS filesystem, go with FreeBSD. If you need the latest pf, want a secure by default OS, and only swear by LibreSSL, go with OpenBSD. Lucky for us, a home gateway can be done with both, so let's continue the party with FreeBSD 10 !
DESCRIPTION :
___________________________________________________________
___________________________________________________________
The FreeBSD VPN gateway we'll see soon, brings on the following features :
- DHCP server to distribute network parameters to your LAN
- DNS cache/server to speed up DNS requests
- DNS encryption so that every outgoing request cannot be spied on by your ISP
- VPN gateway to your VPN provider (AirVPN is used on this article)
- Prevents any direct Internet access from the LAN (prevents VPN bypass)
- Intercept DNS leaks from the LAN to the Internet, and redirect them to the local DNSCypt.
It could be sume up as an encrypted DNS and VPN gateway, dropping any traffic to the Internet when the VPN is down.
PREREQUISITES :
___________________________________________________________
___________________________________________________________
To make a FreeBSD VPN gateway you will need the following :
- A computer with two network cards
- Two Ethernet cables
- A FreeBSD ISO
- A VPN provider subscription, providing raw OpenVPN configuration file
The network map is a typical home network with one or two computers, and one DSL router from the ISP :

I keep the same router I used for OpenBSD in my last article, a Shuttle DS437, which is a fanless and noiseless small case (SSD required), to build a low energy router (10W idle, equivalent to two Raspberry Pi). FreeBSD 10.1-RELEASE finally properly recognise the network card chipset RTL8111G (10.0-RELEASE did not). As I already built from sources my system and packages in the past when FreeBSD 10.0-RELEASE was not working with RTL8111G chipset, I will provide the steps to build packages from sources, while at the same time also giving the steps to do it all with binary packages/updates. It will allow you to follow this guide no matter you use FreeBSD 10.1-RELEASE or FreeBSD 10.1-STABLE (and I suppose FreeBSD 10.1-CURRENT too).
- A computer with two network cards
- Two Ethernet cables
- A FreeBSD ISO
- A VPN provider subscription, providing raw OpenVPN configuration file
The network map is a typical home network with one or two computers, and one DSL router from the ISP :
I keep the same router I used for OpenBSD in my last article, a Shuttle DS437, which is a fanless and noiseless small case (SSD required), to build a low energy router (10W idle, equivalent to two Raspberry Pi). FreeBSD 10.1-RELEASE finally properly recognise the network card chipset RTL8111G (10.0-RELEASE did not). As I already built from sources my system and packages in the past when FreeBSD 10.0-RELEASE was not working with RTL8111G chipset, I will provide the steps to build packages from sources, while at the same time also giving the steps to do it all with binary packages/updates. It will allow you to follow this guide no matter you use FreeBSD 10.1-RELEASE or FreeBSD 10.1-STABLE (and I suppose FreeBSD 10.1-CURRENT too).
SUMMARY :
___________________________________________________________
___________________________________________________________
-
INTRODUCTION
- FIRST START
- FSTAB
- PACKAGES INSTALL
- NTP & SYSLOG
- POSTFIX
- SYSTEM SECURITY
- DHCP
- DNS
- FIREWALL
- VPN
- BEYOND VPN
DESCRIPTION
PREREQUISITES
GENERAL CONFIGURATION
GATEWAY CONFIGURATION
CONCLUSION
CHANGELOG
LINKS
1. FIRST START
___________________________________________________________
___________________________________________________________
You can download FreeBSD from a mirror near you, and choose the version you want. This article is based only
on FreeBSD 10 though. Once you have booted on the iso for your architecture, for instance amd64, you just have to answer simple questions to get started, see below.
Please note that supporting the FreeBSD project is very welcome, you can do so by donating directly to the FreeBSD Foundation, or by buying CD or DVD at FreeBSDMall.
Below is the graphical install, you have to modify the values below according to your country, network card detected name, your ISP DNS, etc... :
Screen 1/37 : The boot screen from the CD, let the default choice and press enter.

Screen 2/37 : Hard choice, isn't it ? (hint : first choice).

Screen 3/37 : Choose your keyboard layout here, below an example for a French one.

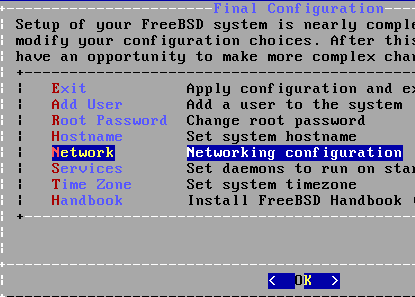
Screen 4/37 : Choose the hostname you want for your home gateway, feel free to be creative !

Screen 5/37 : Install the minimum, we will add later what we need.

Screen 6/37 : Partitioning time. I prefer to create manually separate partitions, because the guided automatic choice creates one big partition (plus swap), and that could cause problems eventually. Indeed, if one programme turns crazy and fills all of your remaining disk space with a log file, or if the partition becomes corrupted, your system won't boot anymore. By separating things, you still have a chance to mount in single user mode the root partition, and fix your system from there. Also, Michael W.LUCAS (Absolute FreeBSD, 2nd edition, FreeBSD Mastery: Storage Essentials) advises creating separate partitions, which is enough for me.

Screen 7/37 : In manual mode, no partitions are created.

Screen 8/37 : Press Create, then choose your partitioning scheme, here we choose GPT.

Screen 9/37 : Press Create, and create a 64K boot partition.

Screen 10/37 : Press Create, and create a root partition, 5GB for instance or more if you have at least a 32GB HDD. Do not forget to fill the label, we will need it later.

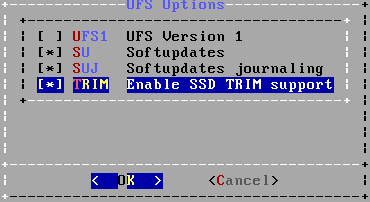
Screen 11/37 : Choose Options, let the defaults softupdates + journaling, and select TRIM if you have a SSD.
Screen 12/37 : Press Create, and create a swap partition of 2GB.

Screen 13-15/37 : Create the following partitions (as above, fill the label and select the TRIM option if you have a SSD) :

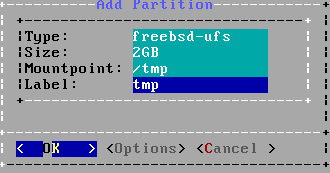

Screen 16/37 : Your partitioning should look like this, with TRIM enabled, labels for each partition, and custom partition size depending on your HDD space.

Screen 17/37 : Confirm the modifications.

Screen 18/37 : Enter a password for the root account.

Screen 19/37 : Choose to configure your LAN interface, em0 below on the VM, re0 on my real router.

Screen 20-23/37 : Configure your LAN facing network interface.


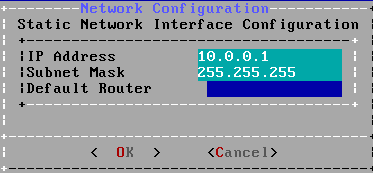
Screen 24/37 : Temporary DNS configuration of your router : you may choose your ISP modem IP, your ISP DNS servers, OpenDNS servers, etc... This is required at first to update the system and to install packages. Later, we will modify the DNS configuration when we will install DNSCrypt.

Screen 25-28/37 : Choose your timezone.


Screen 29/37 : Start only SSH at startup.

Screen 30-32/37 : Create your regular everyday user (put it in the "wheel" group).


Screen 33-35/37 : Configure your Internet/outbound interface (egress). The default gateway should be your ISP router LAN IP address.


Screen 36-37/37 : Installation finished, you can now reboot !


If you installed FreeBSD 10-RELEASE, please apply all available security updates, then reboot :
If you installed FreeBSD 10-STABLE, please follow this article to update it from sources.
Please note that supporting the FreeBSD project is very welcome, you can do so by donating directly to the FreeBSD Foundation, or by buying CD or DVD at FreeBSDMall.
Below is the graphical install, you have to modify the values below according to your country, network card detected name, your ISP DNS, etc... :
Screen 1/37 : The boot screen from the CD, let the default choice and press enter.
Screen 2/37 : Hard choice, isn't it ? (hint : first choice).
Screen 3/37 : Choose your keyboard layout here, below an example for a French one.
Screen 4/37 : Choose the hostname you want for your home gateway, feel free to be creative !
Screen 5/37 : Install the minimum, we will add later what we need.
Screen 6/37 : Partitioning time. I prefer to create manually separate partitions, because the guided automatic choice creates one big partition (plus swap), and that could cause problems eventually. Indeed, if one programme turns crazy and fills all of your remaining disk space with a log file, or if the partition becomes corrupted, your system won't boot anymore. By separating things, you still have a chance to mount in single user mode the root partition, and fix your system from there. Also, Michael W.LUCAS (Absolute FreeBSD, 2nd edition, FreeBSD Mastery: Storage Essentials) advises creating separate partitions, which is enough for me.
Screen 7/37 : In manual mode, no partitions are created.
Screen 8/37 : Press Create, then choose your partitioning scheme, here we choose GPT.
Screen 9/37 : Press Create, and create a 64K boot partition.
Screen 10/37 : Press Create, and create a root partition, 5GB for instance or more if you have at least a 32GB HDD. Do not forget to fill the label, we will need it later.
Screen 11/37 : Choose Options, let the defaults softupdates + journaling, and select TRIM if you have a SSD.
Screen 12/37 : Press Create, and create a swap partition of 2GB.
Screen 13-15/37 : Create the following partitions (as above, fill the label and select the TRIM option if you have a SSD) :
Screen 16/37 : Your partitioning should look like this, with TRIM enabled, labels for each partition, and custom partition size depending on your HDD space.
Screen 17/37 : Confirm the modifications.
Screen 18/37 : Enter a password for the root account.
Screen 19/37 : Choose to configure your LAN interface, em0 below on the VM, re0 on my real router.
Screen 20-23/37 : Configure your LAN facing network interface.
Screen 24/37 : Temporary DNS configuration of your router : you may choose your ISP modem IP, your ISP DNS servers, OpenDNS servers, etc... This is required at first to update the system and to install packages. Later, we will modify the DNS configuration when we will install DNSCrypt.
Screen 25-28/37 : Choose your timezone.
Screen 29/37 : Start only SSH at startup.
Screen 30-32/37 : Create your regular everyday user (put it in the "wheel" group).
Screen 33-35/37 : Configure your Internet/outbound interface (egress). The default gateway should be your ISP router LAN IP address.
Screen 36-37/37 : Installation finished, you can now reboot !
If you installed FreeBSD 10-RELEASE, please apply all available security updates, then reboot :
# freebsd-update fetch install
If you installed FreeBSD 10-STABLE, please follow this article to update it from sources.
2. FSTAB
___________________________________________________________
___________________________________________________________
By default, the partitions are mounted by their device name, for instance /dev/ada0p2. However, if you change your motherboard, or swap SATA cables,
or simply install a new system, your disk may not boot anymore. Indeed, the device name will change. To prevent that, we have assigned a label to each
partition when we created them, which will allow us now to modify /etc/fstab and specify the labels of the partitions, instead of the device name.
A simple method is to boot into single user mode (choice 2 at the boot screen), and then check that all labels are created :
This command shows all labels created in /dev/gpt. You should find the labels you created : root, swap, var, tmp, usr.
If you forgot a label for a given partition, root for instance, create it now (you must type the device name according to your system) :
Now let's modify /etc/fstab. We first mount all filesystems from fstab, then make the root partition writable :
New fstab with labels :
You can now reboot. If you created all labels and didn't miss one, it will boot fine. Notice that we added the "noatime" option, to prevent FreeBSD to write the access time of files. It is useful on a SSD to decrease the write accesses to the disk. This increases ths disk's life.
After the reboot, check everything is mounted :
Then, as Michael W.LUCAS advises, as we use labels only from now on, we can disable other types of partition tags such as disk ID and GPT ID :
This way we stay consistent, and we won't mix error messages on logs with labels, disk ID and gpt ID.
A simple method is to boot into single user mode (choice 2 at the boot screen), and then check that all labels are created :
# ls /dev/gpt/
root swap var tmp usr
root swap var tmp usr
This command shows all labels created in /dev/gpt. You should find the labels you created : root, swap, var, tmp, usr.
If you forgot a label for a given partition, root for instance, create it now (you must type the device name according to your system) :
# glabel label gpt/root /dev/ada0p2
Now let's modify /etc/fstab. We first mount all filesystems from fstab, then make the root partition writable :
# mount -a
# mount -uw /
# vi /etc/fstab
Default fstab (old one) :# mount -uw /
# vi /etc/fstab
/dev/ada0p2 / ufs rw 1 1
/dev/ada0p3 none swap sw 0 0
/dev/ada0p4 /var ufs rw 2 2
/dev/ada0p5 /tmp ufs rw 2 2
/dev/ada0p6 /usr ufs rw 2 2
/dev/ada0p3 none swap sw 0 0
/dev/ada0p4 /var ufs rw 2 2
/dev/ada0p5 /tmp ufs rw 2 2
/dev/ada0p6 /usr ufs rw 2 2
New fstab with labels :
/dev/gpt/root / ufs rw,noatime 1 1
/dev/gpt/swap none swap sw,noatime 0 0
/dev/gpt/var /var ufs rw,noatime 2 2
/dev/gpt/tmp /tmp ufs rw,noatime 2 2
/dev/gpt/usr /usr ufs rw,noatime 2 2
/dev/gpt/swap none swap sw,noatime 0 0
/dev/gpt/var /var ufs rw,noatime 2 2
/dev/gpt/tmp /tmp ufs rw,noatime 2 2
/dev/gpt/usr /usr ufs rw,noatime 2 2
You can now reboot. If you created all labels and didn't miss one, it will boot fine. Notice that we added the "noatime" option, to prevent FreeBSD to write the access time of files. It is useful on a SSD to decrease the write accesses to the disk. This increases ths disk's life.
After the reboot, check everything is mounted :
# mount
/dev/gpt/root on / (ufs, local, noatime, journaled soft-updates)
devfs on /dev (devfs, local, multilabel)
/dev/gpt/var on /var (ufs, local, noatime, journaled soft-updates)
/dev/gpt/tmp on /tmp (ufs, local, noatime, journaled soft-updates)
/dev/gpt/usr on /usr (ufs, local, noatime, journaled soft-updates)
Then, as Michael W.LUCAS advises, as we use labels only from now on, we can disable other types of partition tags such as disk ID and GPT ID :
# vi /boot/loader.conf
# We use partitions labels, disable disk ID and gpt ID
kern.geom.label.disk_ident.enable=0
kern.geom.label.gptid.enable=0
kern.geom.label.disk_ident.enable=0
kern.geom.label.gptid.enable=0
This way we stay consistent, and we won't mix error messages on logs with labels, disk ID and gpt ID.
3. PACKAGES INSTALL
___________________________________________________________
___________________________________________________________
We have to install the packages we need, that we will configure afterward. Below I provide both methods : binary install with pkg, or Ports tree install
with portsnap.
If you plan installing packages from sources:
Below I choose to install :
- sudo : to work with our regular non admin account, and run commands as root when needed.
- pftop : displays the pf state table in realtime, useful to debug.
- openntpd : replace the base ntpd installed with the system, which cannot bind to only one IP address (more on this later).
- postfix : I do not like the base Sendmail included with FreeBSD, I prefer to replace it with Postfix.
- isc-dhcp42-server : will be our DHCP server.
- dnscrypt-proxy : will allow us to encrypt our DNS requests.
- openvpn : our VPN client
Now choose your prefered package install method.
(1) BINARY : answer Yes when the system asks you to download pkgng. Answer Yes when Postfix asks you if it should update mailer.conf.
(2) PORTS : Keep all the defaults. Answer Yes when Postfix asks you if it should update mailer.conf.
Now you can modify the sudoer file to allow your user account to use "sudo" :
It's time to logout (CTRL+D), and to login with your regular account from now on.
If you plan installing packages from sources:
# portsnap fetch extract
# cd /usr/ports/ports-mgmt/portmaster
# make install clean
# cd /usr/ports/ports-mgmt/portmaster
# make install clean
Below I choose to install :
- sudo : to work with our regular non admin account, and run commands as root when needed.
- pftop : displays the pf state table in realtime, useful to debug.
- openntpd : replace the base ntpd installed with the system, which cannot bind to only one IP address (more on this later).
- postfix : I do not like the base Sendmail included with FreeBSD, I prefer to replace it with Postfix.
- isc-dhcp42-server : will be our DHCP server.
- dnscrypt-proxy : will allow us to encrypt our DNS requests.
- openvpn : our VPN client
Now choose your prefered package install method.
(1) BINARY : answer Yes when the system asks you to download pkgng. Answer Yes when Postfix asks you if it should update mailer.conf.
# pkg
# pkg update
# pkg install sudo pftop openntpd postfix isc-dhcp42-server dnscrypt-proxy openvpn
# pkg update
# pkg install sudo pftop openntpd postfix isc-dhcp42-server dnscrypt-proxy openvpn
(2) PORTS : Keep all the defaults. Answer Yes when Postfix asks you if it should update mailer.conf.
# portmaster -d --no-confirm mail/postfix29 net/isc-dhcp42-server sysutils/pftop net/openntpd dns/dnscrypt-proxy security/sudo security/openvpn
Now you can modify the sudoer file to allow your user account to use "sudo" :
# visudo
# Uncomment to allow people in group wheel to run all commands
# and set environment variables.
%wheel ALL=(ALL) SETENV: ALL
# and set environment variables.
%wheel ALL=(ALL) SETENV: ALL
It's time to logout (CTRL+D), and to login with your regular account from now on.
4. NTP & SYSLOG
___________________________________________________________
___________________________________________________________
We could have kept the default ntpd installed with the base OS. However, I may need to use FreeBSD's Jails in the future, and this feature requires an exclusive
bind to its own IP address. The base ntpd can only bind to all interfaces, it cannot be forced to listen on only one or none. Consequently, having the
default ntpd installed and started will prevent any Jail to start. Although in this article we won't build any Jail, I foresee to add at least one
in the future on my router. OpenNTPD on the other hand, can be made not listening to any IP address.
Now we need to modify /etc/rc.conf to disable ntpd and enable OpenNTPD at boot:
Start OpenNTPD :
Finally about Syslog, by default it also listens to all interfaces, so we make it not listening at all :
$ sudo vi /usr/local/etc/ntpd.conf
server 0.pool.ntp.org
server 1.pool.ntp.org
server 2.pool.ntp.org
server 3.pool.ntp.org
server 1.pool.ntp.org
server 2.pool.ntp.org
server 3.pool.ntp.org
Now we need to modify /etc/rc.conf to disable ntpd and enable OpenNTPD at boot:
$ sudo service ntpd stop
$ sudo vi /etc/rc.conf
$ sudo vi /etc/rc.conf
# NTP
ntpd_enable="NO"
openntpd_enable="YES"
openntpd_flags="-s" # sync time at boot, and afterward
ntpd_enable="NO"
openntpd_enable="YES"
openntpd_flags="-s" # sync time at boot, and afterward
Start OpenNTPD :
$ sudo service openntpd start
Finally about Syslog, by default it also listens to all interfaces, so we make it not listening at all :
$ sudo vi /etc/rc.conf
# Syslog
syslogd_flags="-ss" # do not bind to any address
syslogd_flags="-ss" # do not bind to any address
$ sudo service syslogd restart
5. POSTFIX
___________________________________________________________
___________________________________________________________
I prefer postfix over sendmail, I find it easier to configure. While in this article I don't have any script to send notifications to an external address,
it may be useful later. As above, we have to ensure that postfix won't be listening to all interfaces but rather to localhost. It is part of the plan to prepare
for a future jail.
The main postfix configuration file :
Stop sendmail and modify /etc/rc.conf :
We also need to make sure that every programme understands that sendmail is disabled :
Now let's bring postfix to life :
RIP sendmail :-)
The main postfix configuration file :
$ sudo vi /usr/local/etc/postfix/main.cf
queue_directory = /var/spool/postfix
command_directory = /usr/local/sbin
daemon_directory = /usr/local/libexec/postfix
data_directory = /var/db/postfix
mail_owner = postfix
unknown_local_recipient_reject_code = 550
mynetworks_style = host
# Listen to localhost only
inet_interfaces = loopback-only
# If you want your emails to be sent through another mail server you control
#relayhost = [an.ip.address]
debug_peer_level = 2
debugger_command =
PATH=/bin:/usr/bin:/usr/local/bin:/usr/X11R6/bin
ddd $daemon_directory/$process_name $process_id & sleep 5
sendmail_path = /usr/local/sbin/sendmail
newaliases_path = /usr/local/bin/newaliases
mailq_path = /usr/local/bin/mailq
setgid_group = maildrop
html_directory = /usr/local/share/doc/postfix
manpage_directory = /usr/local/man
sample_directory = /usr/local/etc/postfix
readme_directory = /usr/local/share/doc/postfix
inet_protocols = ipv4
Stop sendmail and modify /etc/rc.conf :
$ sudo service sendmail stop
$ sudo vi /etc/rc.conf
$ sudo vi /etc/rc.conf
# Postfix
postfix_enable="YES"
sendmail_enable="NO"
sendmail_submit_enable="NO"
sendmail_outbound_enable="NO"
sendmail_msp_queue_enable="NO"
postfix_enable="YES"
sendmail_enable="NO"
sendmail_submit_enable="NO"
sendmail_outbound_enable="NO"
sendmail_msp_queue_enable="NO"
We also need to make sure that every programme understands that sendmail is disabled :
$ sudo vi /etc/periodic.conf
daily_clean_hoststat_enable="NO"
daily_status_mail_rejects_enable="NO"
daily_status_include_submit_mailq="NO"
daily_submit_queuerun="NO"
daily_status_mail_rejects_enable="NO"
daily_status_include_submit_mailq="NO"
daily_submit_queuerun="NO"
Now let's bring postfix to life :
$ sudo newaliases
$ sudo service postfix start
$ sudo service postfix start
RIP sendmail :-)
6. SYSTEM SECURITY
___________________________________________________________
___________________________________________________________
Default FreeBSD's security can be greatly improved, compared with OpenBSD default out of the box security. You can greatly restrict the privileges of regular users, increase memory protection,
enforce a network policy, add randomness in the IP stack and in processes, enable encryption of swap, and enable a higher securelevel to prevent even root to modify critical system parts. Most of
these is done in /etc/sysctl.conf
Although securelevel can be added to /etc/sysctl.conf, it will run fine for level of 1, but will give you boot issues for a level of 2 or greater. The best place on FreeBSD to define securelevel is in /etc/rc.conf. Below we add it commented, as we don't modify securelevel for the moment:
Now apply the configuration :
It is wise to wait that our router is fully functionnal before enabling securelevel 1, as it can prevent us from modifying the system or loading kernel drivers on the fly (which is the whole point of securelevel). It can then be used to lock down a working system.
Now it's time to encrypt the swap, which is basically a three-steps procedure : load GEOM ELI in /boot/loader.conf, specify encryption in /etc/rc.conf, and modify /etc/fstab to tell the OS we want ELI encryption on swap partition.
First, clear the swap of sensitive information. We use below the label of our swap partition. The operation takes 90s on my system :
Load GEOM ELI module at boot :
Choose swap encryption cipher, default is AES-XTS 128, but you can choose AES-XTS 256 or any other supported cipher such as Blowfish-CBC, Camellia-CBC and 3DES-CBC :
Then, modify your /etc/fstab to mount the encrypted swap at boot. Just add ".eli" at the end of the swap label name :
Now reboot. You can then tell with "mount" and "swapinfo" that all of your partitions are mounted by their label name, and that swap is encrypted (".eli" at the end of the label).
When your system will be fully operational, and that you will want to lock it down by setting securelevel to 1, you can use the two following scripts. First one is to lock down your router from a running system. The second one is for unlocking it from a single user mode shell. I put them in /root as it should only be used by the root account, and this directory is accessible in single user mode as long as / is mounted, even if other partitions are not or cannot be.
This locking script removes the comment in front of "kern_securelevel" in /etc/rc.conf, sets a system immutable flags on /etc/rc.conf and /etc/sysctl.conf to prevent modification (even by root), and raises the system securelevel to 1 (all without rebooting):
This unlocking script can only be ran from single user mode. While it loads the french keyboard layout, you have to modify this line to your language (or remove it). This scripts does not type "exit" automatically, to allow you to do other checks if you wish too. Type "exit" when you have finished. This step will be mandatory if you plan on updating your system with "freebsd-update", which cannot be done if your system is locked (if you try you are greeted with "Updates cannot be installed when the system securelevel is greater than 0").
Now make these scripts executable, readable/executable only by root, and set a system immutable flag on them to prevent any modification :
I did not yet talk of the SSH security, that you can configure at /etc/ssh/sshd_config. The very least is (if possible) to not open your SSH port to the Internet, and to use a strong password. Better, create a SSH key + passphrase, and only allow SSH key authentication and disable password authentication. If you must open your SSH port to the Internet for any reason, SSH key and passphrase is a must, and if possible only allow access from a specific IP address or IP range in your firewall. You may also modify the default SSH port from 22 to anything else.
Below we will create a SSH key based on the Elliptic Curve algorithm ED25519 which has a fixed keysize of 256bits. This implementation of EdDSA algorithm prevents known side-channel attacks, and is as robust as a 3000bits RSA key or a 128bits symetric cipher key. Do not forget the passphrase !:
Then copy your public key to ~/.ssh/authorized_keys, replace "YOUR_USER" with your regular user account :
Copy the content of your private key "~/.ssh/id_ed25519" on the remote computer you will use to connect to your router, and set a permission of "600" on it. If on Linux or BSD, you will be able to connect later with "ssh -i your_private_key 10.0.0.1".
Now modify your SSH server with this temporary configuration :
Restart sshd :
Connect from your remote computer with the private key, for instance with "ssh -i your_private_key 10.0.0.1", and check that connecting with your regular user and with the SSH key fully works. Once it's working, modify the following line in /etc/ssh/sshd_config :
Restart sshd :
From now on, only your regular user can connect with your SSH key and passphrase. No other account can, not even root. You may modify the default SSH port if you wish too.
Besides the fact we haven't yet raised the securelevel, the system is now more secure than in its default state. We will now be able to configure the core router's features : DHCP, DNS, firewall, and OpenVPN.
6.1. SYSCTL
$ sudo vi /etc/sysctl.conf
#Prevent users from seeing other users processes
security.bsd.see_other_uids=0
security.bsd.see_other_gids=0
# Prevent users from creating hard link to files owned by others
security.bsd.hardlink_check_gid=1
security.bsd.hardlink_check_uid=1
# Prevent unprivileged users from reading system message buffer (dmesg)
security.bsd.unprivileged_read_msgbuf=0
# Memory protection (ELF NX 32 and 64 bits already enabled by default)
security.bsd.stack_guard_page=1
# Network policy : drop packets on closed ports
net.inet.tcp.blackhole=2 # 1 = SYN only, 2 = ALL packets
net.inet.udp.blackhole=1
# Random IP ID and Process ID
net.inet.ip.random_id=1
kern.randompid=1000 # Modulus, the greater the more random
# Drop redirects
net.inet.ip.redirect=0
net.inet.icmp.drop_redirect=1
# Always use TCP SYNcookies (default is only when syn table is full)
net.inet.tcp.syncookies_only=1
Although securelevel can be added to /etc/sysctl.conf, it will run fine for level of 1, but will give you boot issues for a level of 2 or greater. The best place on FreeBSD to define securelevel is in /etc/rc.conf. Below we add it commented, as we don't modify securelevel for the moment:
$ sudo vi /etc/rc.conf
#kern_securelevel_enable="YES"
#kern_securelevel="1"
#kern_securelevel="1"
Now apply the configuration :
$ sudo sysctl -f /etc/sysctl.conf
It is wise to wait that our router is fully functionnal before enabling securelevel 1, as it can prevent us from modifying the system or loading kernel drivers on the fly (which is the whole point of securelevel). It can then be used to lock down a working system.
6.2. SWAP ENCRYPTION
Now it's time to encrypt the swap, which is basically a three-steps procedure : load GEOM ELI in /boot/loader.conf, specify encryption in /etc/rc.conf, and modify /etc/fstab to tell the OS we want ELI encryption on swap partition.
First, clear the swap of sensitive information. We use below the label of our swap partition. The operation takes 90s on my system :
$ sudo dd if=/dev/random of=/dev/gpt/swap bs=1m
Load GEOM ELI module at boot :
$ sudo vi /boot/loader.conf
# Load GEOM ELI module for partition encryption
geom_eli_load=”YES”
geom_eli_load=”YES”
Choose swap encryption cipher, default is AES-XTS 128, but you can choose AES-XTS 256 or any other supported cipher such as Blowfish-CBC, Camellia-CBC and 3DES-CBC :
$ sudo vi /etc/rc.conf
# SWAP encryption
geli_swap_flags=”-e AES -l 128 -s 4096 -d”
geli_swap_flags=”-e AES -l 128 -s 4096 -d”
Then, modify your /etc/fstab to mount the encrypted swap at boot. Just add ".eli" at the end of the swap label name :
$ sudo vi /etc/fstab
/dev/gpt/swap.eli none swap sw 0 0
Now reboot. You can then tell with "mount" and "swapinfo" that all of your partitions are mounted by their label name, and that swap is encrypted (".eli" at the end of the label).
6.3. SCRIPTS
When your system will be fully operational, and that you will want to lock it down by setting securelevel to 1, you can use the two following scripts. First one is to lock down your router from a running system. The second one is for unlocking it from a single user mode shell. I put them in /root as it should only be used by the root account, and this directory is accessible in single user mode as long as / is mounted, even if other partitions are not or cannot be.
This locking script removes the comment in front of "kern_securelevel" in /etc/rc.conf, sets a system immutable flags on /etc/rc.conf and /etc/sysctl.conf to prevent modification (even by root), and raises the system securelevel to 1 (all without rebooting):
$ sudo vi /root/lock.sh
#!/bin/sh
clear
echo "SYSTEM LOCK"
echo "_______________________________________________________________"
echo "1/3 - Enable kern.securelevel in /etc/rc.conf"
sed -i -e "s/#kern_securelevel/kern_securelevel/g" /etc/rc.conf
cat /etc/rc.conf | grep kern_securelevel
echo ""
echo "2/3 - Add chflags schg to /etc/rc.conf and /etc/sysctl.conf"
chflags schg /etc/sysctl.conf
chflags schg /etc/rc.conf
ls -lo /etc/rc.conf
ls -lo /etc/sysctl.conf
echo ""
echo "3/3 Raising securelevel :"
sysctl kern.securelevel=1
echo ""
echo "In this securelevel, the hardened system cannot be updated, files with the 'schg' flag cannot be modified."
echo ""
echo "To unlock the system, reboot in single user mode and run /root/unlock.sh"
This unlocking script can only be ran from single user mode. While it loads the french keyboard layout, you have to modify this line to your language (or remove it). This scripts does not type "exit" automatically, to allow you to do other checks if you wish too. Type "exit" when you have finished. This step will be mandatory if you plan on updating your system with "freebsd-update", which cannot be done if your system is locked (if you try you are greeted with "Updates cannot be installed when the system securelevel is greater than 0").
$ sudo vi /root/unlock.sh
#!/bin/sh
echo ""
echo "1/5 - Mounting / writable"
mount -uw /
mount
echo ""
echo "2/5 - Keyboard FR"
kbdcontrol -l fr.iso.acc
echo ""
echo "3/5 - Remove chflags schg from /etc/rc.conf and /etc/sysctl.conf"
chflags noschg /etc/rc.conf
chflags noschg /etc/sysctl.conf
ls -lo /etc/rc.conf
ls -lo /etc/sysctl.conf
echo ""
echo "4/5 - Disable kern.securelevel from /etc/sysctl.conf"
sed -i -e "s/kern_securelevel/#kern_securelevel/g" /etc/rc.conf
grep kern_securelevel /etc/sysctl.conf
echo ""
echo "5/5 - Remounting / read-only"
mount -ur /
mount
echo ""
echo "To continue booting type : exit"
echo ""
echo "1/5 - Mounting / writable"
mount -uw /
mount
echo ""
echo "2/5 - Keyboard FR"
kbdcontrol -l fr.iso.acc
echo ""
echo "3/5 - Remove chflags schg from /etc/rc.conf and /etc/sysctl.conf"
chflags noschg /etc/rc.conf
chflags noschg /etc/sysctl.conf
ls -lo /etc/rc.conf
ls -lo /etc/sysctl.conf
echo ""
echo "4/5 - Disable kern.securelevel from /etc/sysctl.conf"
sed -i -e "s/kern_securelevel/#kern_securelevel/g" /etc/rc.conf
grep kern_securelevel /etc/sysctl.conf
echo ""
echo "5/5 - Remounting / read-only"
mount -ur /
mount
echo ""
echo "To continue booting type : exit"
Now make these scripts executable, readable/executable only by root, and set a system immutable flag on them to prevent any modification :
$ sudo chmod 700 /root/*.sh
$ sudo chown root:wheel /root/*.sh
$ sudo chflags schg /root/*.sh
$ sudo chown root:wheel /root/*.sh
$ sudo chflags schg /root/*.sh
6.4. SSH
I did not yet talk of the SSH security, that you can configure at /etc/ssh/sshd_config. The very least is (if possible) to not open your SSH port to the Internet, and to use a strong password. Better, create a SSH key + passphrase, and only allow SSH key authentication and disable password authentication. If you must open your SSH port to the Internet for any reason, SSH key and passphrase is a must, and if possible only allow access from a specific IP address or IP range in your firewall. You may also modify the default SSH port from 22 to anything else.
Below we will create a SSH key based on the Elliptic Curve algorithm ED25519 which has a fixed keysize of 256bits. This implementation of EdDSA algorithm prevents known side-channel attacks, and is as robust as a 3000bits RSA key or a 128bits symetric cipher key. Do not forget the passphrase !:
$ ssh-keygen -t ed25519
Generating public/private ed25519 key pair.
Enter file in which to save the key (/home/YOUR_USER/.ssh/id_ed25519):
Created directory '/home/YOUR_USER/.ssh'.
Enter passphrase (empty for no passphrase):
Enter same passphrase again:
Your identification has been saved in /home/YOUR_USER/.ssh/id_ed25519.
Your public key has been saved in /home/YOUR_USER/.ssh/id_ed25519.pub.
The key fingerprint is:
xx:xx:xx:xx:xx:xx:xx:xx:xx:xx:xx:xx:xx:xx:xx:xx YOUR_USER@YOUR_HOSTNAME
Then copy your public key to ~/.ssh/authorized_keys, replace "YOUR_USER" with your regular user account :
$ cp /usr/home/YOUR_USER/.ssh/id_ed25519.pub /usr/home/YOUR_USER/.ssh/authorized_keys
Copy the content of your private key "~/.ssh/id_ed25519" on the remote computer you will use to connect to your router, and set a permission of "600" on it. If on Linux or BSD, you will be able to connect later with "ssh -i your_private_key 10.0.0.1".
Now modify your SSH server with this temporary configuration :
$ sudo vi /etc/ssh/sshd_config
Port 22
ListenAddress 10.0.0.1
AllowUsers YOUR_USER
PasswordAuthentication yes
AllowTcpForwarding no
X11Forwarding no
Subsystem sftp /usr/libexec/sftp-server
ListenAddress 10.0.0.1
AllowUsers YOUR_USER
PasswordAuthentication yes
AllowTcpForwarding no
X11Forwarding no
Subsystem sftp /usr/libexec/sftp-server
Restart sshd :
$ sudo service sshd restart
Connect from your remote computer with the private key, for instance with "ssh -i your_private_key 10.0.0.1", and check that connecting with your regular user and with the SSH key fully works. Once it's working, modify the following line in /etc/ssh/sshd_config :
PasswordAuthentication no
Restart sshd :
$ sudo service sshd restart
From now on, only your regular user can connect with your SSH key and passphrase. No other account can, not even root. You may modify the default SSH port if you wish too.
Besides the fact we haven't yet raised the securelevel, the system is now more secure than in its default state. We will now be able to configure the core router's features : DHCP, DNS, firewall, and OpenVPN.
7. DHCP
___________________________________________________________
___________________________________________________________
We are going to configure the DHCP server we installed earlier, to advertise ourself as the LAN gateway and as the DNS server. About Jails I talked earlier, DHCP listens to all interfaces, which
would prevent the use of jails. I guess then DHCP should be jailed and given raw network access, to allow us to create another jail on the system. That is not the point of this article though.
Let's configure DHCP :
We have to enable DHCP in rc.conf, where we also specify that we want to run it chrooted :
Let's create the chroot directory we have specified above and start DHCP :
$ sudo vi /usr/local/etc/dhcpd.conf
option domain-name-servers 10.0.0.1;
subnet 10.0.0.0 netmask 255.255.255.0 {
option routers 10.0.0.1;
range 10.0.0.50 10.0.0.60;
}
subnet 10.0.0.0 netmask 255.255.255.0 {
option routers 10.0.0.1;
range 10.0.0.50 10.0.0.60;
}
We have to enable DHCP in rc.conf, where we also specify that we want to run it chrooted :
$ sudo vi /etc/rc.conf
# DHCP
dhcpd_enable="YES"
dhcpd_flags="-q"
dhcpd_conf="/usr/local/etc/dhcpd.conf"
dhcpd_ifaces="re0"
dhcpd_withumask="022"
dhcpd_chuser_enable="YES"
dhcpd_withuser="dhcpd"
dhcpd_withgroup="dhcpd"
dhcpd_chroot_enable="YES"
dhcpd_devfs_enable="YES"
dhcpd_rootdir="/usr/chroot/dhcpd"
dhcpd_enable="YES"
dhcpd_flags="-q"
dhcpd_conf="/usr/local/etc/dhcpd.conf"
dhcpd_ifaces="re0"
dhcpd_withumask="022"
dhcpd_chuser_enable="YES"
dhcpd_withuser="dhcpd"
dhcpd_withgroup="dhcpd"
dhcpd_chroot_enable="YES"
dhcpd_devfs_enable="YES"
dhcpd_rootdir="/usr/chroot/dhcpd"
Let's create the chroot directory we have specified above and start DHCP :
$ sudo mkdir -p /usr/chroot/dhcpd
$ sudo service isc-dhcp start
$ sudo service isc-dhcp start
8. DNS
___________________________________________________________
___________________________________________________________
We have to configure two things here : the local Unbound DNS service which will be used as DNS cache for the LAN, and DNScrypt-proxy which will actually do the outgoing encrypted DNS requests.
Unbound will be listening on the LAN interface IP address on port 53, and DNSCrypt on localhost port 40. Querying the former will automatically query the later if the result is not already in
the cache.
Enabling Unbound and configuring DNScrypt is done in /etc/rc.conf :
You can choose your DNScrypt capable server on the following list.
We can start Unbound and DNSCrypt, although configuration is not finished, as it will modify/updates files on the system :
Check this file and update it if not as below (it should have been updated from /etc/resolv.conf):
Now make sure this file won't be modified by the system when Unbound starts. We will do so by setting a user immutable flag on forward.conf, which can be unset by root unlike the system immutable flag. This is not a security mesure against an intruder, but rather a file lock to prevent unwanted modification :
The main Unbound configuration file :
This file mainly tells Unbound that it is allowed to query the localhost, where DNSCrypt is listening, and that it can accept the LAN network to make requests to it.
Let's not forget the main DNS entry point of the system, /etc/resolv.conf :
Now that rc.conf, resolv.conf, forward.conf, and unbound.conf are configured, we can restart Unbound :
If everything has been done correctly, it should work first try, let's check that :-)
The DNS chain is as follow :
LAN request -> (re0) Unbound -> (localhost) DNSCrypt -> (re1) external encrypted DNS request
If something is not working, follow the trail : rc.conf first, then resolv.conf -> forward.conf, and finally unbound.conf.
Enabling Unbound and configuring DNScrypt is done in /etc/rc.conf :
$ sudo vi /etc/rc.conf
# DNS
dnscrypt_proxy_enable="YES"
dnscrypt_proxy_resolver="dnscrypt.eu-nl" # Logless Netherland DNS server
dnscrypt_proxy_flags='-a 127.0.0.1:40'
local_unbound_enable="YES"
dnscrypt_proxy_enable="YES"
dnscrypt_proxy_resolver="dnscrypt.eu-nl" # Logless Netherland DNS server
dnscrypt_proxy_flags='-a 127.0.0.1:40'
local_unbound_enable="YES"
You can choose your DNScrypt capable server on the following list.
We can start Unbound and DNSCrypt, although configuration is not finished, as it will modify/updates files on the system :
$ sudo service dnscrypt-proxy start
$ sudo service local_unbound start
$ sudo service local_unbound start
Check this file and update it if not as below (it should have been updated from /etc/resolv.conf):
$ sudo vi /etc/unbound/forward.conf
forward-zone:
name: .
forward-addr: 127.0.0.1@40
name: .
forward-addr: 127.0.0.1@40
Now make sure this file won't be modified by the system when Unbound starts. We will do so by setting a user immutable flag on forward.conf, which can be unset by root unlike the system immutable flag. This is not a security mesure against an intruder, but rather a file lock to prevent unwanted modification :
$ sudo chflags uchg /etc/unbound/forward.conf
The main Unbound configuration file :
$ sudo vi /etc/unbound/unbound.conf
server:
username: unbound
directory: /var/unbound
chroot: /var/unbound
pidfile: /var/run/local_unbound.pid
auto-trust-anchor-file: /var/unbound/root.key
do-not-query-localhost: no
interface: 10.0.0.1
interface: 127.0.0.1
access-control: 10.0.0.0/24 allow
access-control: 127.0.0.1 allow
include: /etc/unbound/forward.conf
This file mainly tells Unbound that it is allowed to query the localhost, where DNSCrypt is listening, and that it can accept the LAN network to make requests to it.
Let's not forget the main DNS entry point of the system, /etc/resolv.conf :
$ sudo vi /etc/resolv.conf
nameserver 10.0.0.1
options edns0
options edns0
Now that rc.conf, resolv.conf, forward.conf, and unbound.conf are configured, we can restart Unbound :
$ sudo service local_unbound restart
If everything has been done correctly, it should work first try, let's check that :-)
$ host www.bsdnow.tv
www.bsdnow.tv has address 65.39.148.220
www.bsdnow.tv has address 65.39.148.220
The DNS chain is as follow :
LAN request -> (re0) Unbound -> (localhost) DNSCrypt -> (re1) external encrypted DNS request
If something is not working, follow the trail : rc.conf first, then resolv.conf -> forward.conf, and finally unbound.conf.
9. FIREWALL
___________________________________________________________
___________________________________________________________
As FreeBSD pf is some versions older than the one from OpenBSD, we have less room to make different pf configurations as I did in my last article about OpenBSD VPN gateway. Indeed, the
"match" keyword does not exist, the "egress" keyword does not exist either, syntax order is different which is limiting to tag packets first and NAT them afterwards. This time I provide
a single but effective pf configuration for our VPN gateway.
Please modify the variables according to your interfaces names and IP address :
Then enable pf in /etc/rc.conf as well as forwarding :
It is important to not have yet raised the securelevel, to allow us to load our ruleset :
Then, modify /boot/loader.conf to load early pf kernel modules. This way, when securelevel will be set to 1 or more (preventing kernel modules to be loaded), pf will be working. Indeed, modules specified in /boot/loader.conf are loaded at boot first, before securelevel is eventually raised later in the boot process. We can take the opportunity to modify also the waiting time of the boot menu, to speed up the boot time.
Finally, if you want to watch in realtime your pf state table, use pftop installed earlier :
Please modify the variables according to your interfaces names and IP address :
$ sudo vi /etc/pf.conf
# FreeBSD 10 pf syntax below
# Variables and Macro
lan="re0"
egress="re1"
lan_ip="10.0.0.1"
egress_ip="192.168.1.2"
gateway="192.168.1.1"
vpn="tun0"
# Global Policy
set block-policy drop
set loginterface $egress
set skip on lo
scrub all no-df max-mss 1440 random-id reassemble tcp
scrub out on $egress proto udp from $egress_ip to any port 443 set-tos lowdelay
# NAT and RDR rules :
# 1 - only NAT trough the VPN connection. If the VPN is down, there is no Internet access for the LAN.
# 2 - catch DNS leaks from the LAN to the Internet and redirect them to our router
nat on $vpn from ($lan:network) to any -> ($vpn:0)
rdr on $lan proto { tcp udp } from $lan:network to ! $lan_ip port 53 -> $lan_ip
# Default deny and log all
block log all
# Antispoof
antispoof log quick for ($egress)
block in quick log on $egress from { no-route urpf-failed } to any
block out quick log on $egress from any to no-route
# Block IPV6
block quick inet6 all
# Prevent VPN bypass
block out quick log on $egress from ($lan:network) to any
# Drop outbound DNS requests (53), as we use DNSCrypt
block out quick log on $egress proto { tcp udp } from any to any port 53
# Standard rules
pass out quick inet modulate state
pass in quick on $lan
Then enable pf in /etc/rc.conf as well as forwarding :
$ sudo vi /etc/rc.conf
# PF
pf_enable="YES"
pflog_enable="YES"
gateway_enable="YES"
pf_enable="YES"
pflog_enable="YES"
gateway_enable="YES"
It is important to not have yet raised the securelevel, to allow us to load our ruleset :
$ sudo kldload pf
$ sudo kldload pflog
$ sudo pfctl -f /etc/pf.conf
$ sudo kldload pflog
$ sudo pfctl -f /etc/pf.conf
Then, modify /boot/loader.conf to load early pf kernel modules. This way, when securelevel will be set to 1 or more (preventing kernel modules to be loaded), pf will be working. Indeed, modules specified in /boot/loader.conf are loaded at boot first, before securelevel is eventually raised later in the boot process. We can take the opportunity to modify also the waiting time of the boot menu, to speed up the boot time.
$ sudo vi /boot/loader.conf
# Boot menu waiting time (in seconds)
autoboot_delay="2"
# Load PF kernel modules
pf_load="YES"
pflog_load="YES"
autoboot_delay="2"
# Load PF kernel modules
pf_load="YES"
pflog_load="YES"
Finally, if you want to watch in realtime your pf state table, use pftop installed earlier :
$ sudo pftop
10. VPN
___________________________________________________________
___________________________________________________________
Like in my last OpenBSD router article, I end up keeping the same VPN provider. There is plenty out there, more than I wish to try. However, if we set criteria like the following, there is not many VPN
providers left:
- logless (do not keep logs !)
- FreeBSD compatible (should support OpenVPN configuration file)
- not based in the US (the NSA is there)
- provides an online OpenVPN config file generator
- displays its servers status in realtime
- accept payments in BitCoins
- provides censorship bypass options, by offering multiple ways to mount the VPN (80/443 UDP/TCP, SSH/SSL tunneling, etc...)
- should not drop the connection speed to a crawl ! (Internet experience should stay the same)
- allows trying for a few days cheaply
- should offer servers on various countries
- very secure : 4096 bit RSA, AES-256-CBC, 4096 bit Diffie-Hellman, HMAC SHA1, TLS 2048 bit additional key, Perfect Forward Secrecy (PFS)
- allow for multiple connections simultaneously, for instance one for the router, and at the same time two mobile phones (Android or iOS)
AirVPN perfectly meets the criteria above. I'm using it for many months, and I find it very efficient and reliable.

You are free to use any VPN provider of course, but the setup bellow is a working configuration with AirVPN only. There is many configurations possible, I could have chosen a single remote server, or a country, you can play with their online OpenVPN generator to suit your needs. I have chosen to select 3 servers, the first one is the main I will use, and the two others are backup servers.
Please note that the 3 remote VPN IP addresses I will write from now one are fake/random IP, you cannot copy/paste the configuration as is, you have to modify it according to your remote VPN servers you have chosen.
Create your config directory if not existing:
Now copy via SSH/SFTP (WinSCP for Windows for instance, SCP for Linux or BSD) the files the AirVPN generator created, below is an example :
In case you did not yet do it :
Enable OpenVPN at startup :
Let's connect !
You can check in "/var/log/message" that your VPN connected without error, then check with "ifconfig" that the interface "tun0" is active, and finally with a "route -n show" that the route was added.
You can browse with a client to a website such as http://whoer.net/ to check you are going trough your VPN. You can also go to the AirVPN homepage, where it will displays to which VPN server you are connected. You can also do a "traceroute freebsd.org" and see the VPN magic :-)
Once your router is fully operationnal, and that you checked that even after a reboot everything works flawlessly, you can lock down your system :
- logless (do not keep logs !)
- FreeBSD compatible (should support OpenVPN configuration file)
- not based in the US (the NSA is there)
- provides an online OpenVPN config file generator
- displays its servers status in realtime
- accept payments in BitCoins
- provides censorship bypass options, by offering multiple ways to mount the VPN (80/443 UDP/TCP, SSH/SSL tunneling, etc...)
- should not drop the connection speed to a crawl ! (Internet experience should stay the same)
- allows trying for a few days cheaply
- should offer servers on various countries
- very secure : 4096 bit RSA, AES-256-CBC, 4096 bit Diffie-Hellman, HMAC SHA1, TLS 2048 bit additional key, Perfect Forward Secrecy (PFS)
- allow for multiple connections simultaneously, for instance one for the router, and at the same time two mobile phones (Android or iOS)
AirVPN perfectly meets the criteria above. I'm using it for many months, and I find it very efficient and reliable.
You are free to use any VPN provider of course, but the setup bellow is a working configuration with AirVPN only. There is many configurations possible, I could have chosen a single remote server, or a country, you can play with their online OpenVPN generator to suit your needs. I have chosen to select 3 servers, the first one is the main I will use, and the two others are backup servers.
Please note that the 3 remote VPN IP addresses I will write from now one are fake/random IP, you cannot copy/paste the configuration as is, you have to modify it according to your remote VPN servers you have chosen.
Create your config directory if not existing:
$ sudo mkdir -p /usr/local/etc/openvpn
$ sudo chown root:wheel /usr/local/etc/openvpn
$ sudo chown root:wheel /usr/local/etc/openvpn
Now copy via SSH/SFTP (WinSCP for Windows for instance, SCP for Linux or BSD) the files the AirVPN generator created, below is an example :
$ sudo ls /usr/local/etc/openvpn/
airvpn.ovpn ca.crt ta.key user.crt user.key
$ sudo vi /usr/local/etc/openvpn/airvpn.ovpn
airvpn.ovpn ca.crt ta.key user.crt user.key
$ sudo vi /usr/local/etc/openvpn/airvpn.ovpn
client
dev tun
# Depending on what you have chosen, TCP or UDP (not both !)
proto udp
# When there is multiple "remote" options, OpenVPN tries to connect
# in the order the servers are specified
# Country 1 : Server 1 (Main)
remote x.x.x.x 443
# Country 1 : Server 2 (Backup)
remote x.x.x.x 443
# Country 2 : Server 3 (Backup)
remote x.x.x.x 443
resolv-retry infinite
nobind
persist-key
persist-tun
remote-cert-tls server
cipher AES-256-CBC
comp-lzo no
verb 3
explicit-exit-notify 5
# Chroot OpenVPN and drop root privileges (don't forget to "mkdir /var/empty/tmp")
user openvpn
group openvpn
chroot /var/empty
# do a chmod 600 on them
ca "/usr/local/etc/openvpn/ca.crt"
cert "/usr/local/etc/openvpn/user.crt"
key "/usr/local/etc/openvpn/user.key"
tls-auth "/usr/local/etc/openvpn/ta.key" 1
In case you did not yet do it :
$ sudo mkdir -p /var/empty/tmp
$ sudo chmod 600 /usr/local/etc/openvpn/*.*
$ sudo chmod 600 /usr/local/etc/openvpn/*.*
Enable OpenVPN at startup :
$ sudo vi /etc/rc.conf
# OpenVPN
openvpn_enable="YES"
openvpn_configfile="/usr/local/etc/openvpn/airvpn.ovpn"
openvpn_if="tun"
openvpn_enable="YES"
openvpn_configfile="/usr/local/etc/openvpn/airvpn.ovpn"
openvpn_if="tun"
Let's connect !
$ sudo service openvpn start
$ tail -f /var/log/messages
$ tail -f /var/log/messages
You can check in "/var/log/message" that your VPN connected without error, then check with "ifconfig" that the interface "tun0" is active, and finally with a "route -n show" that the route was added.
You can browse with a client to a website such as http://whoer.net/ to check you are going trough your VPN. You can also go to the AirVPN homepage, where it will displays to which VPN server you are connected. You can also do a "traceroute freebsd.org" and see the VPN magic :-)
Once your router is fully operationnal, and that you checked that even after a reboot everything works flawlessly, you can lock down your system :
$ sudo /root/lock.sh
SYSTEM LOCK
_______________________________________________________________
1/3 - Enable kern.securelevel in /etc/sysctl.conf
kern.securelevel=1
2/3 - Add chflags schg to /etc/rc.conf and /etc/sysctl.conf
-rw-r--r-- 1 root wheel schg 990 14 jul 19:40 /etc/rc.conf
-rw-r--r-- 1 root wheel schg 919 14 jul 19:40 /etc/sysctl.conf
3/3 Raising securelevel :
kern.securelevel: -1 -> 1
In this securelevel, the hardened system cannot be updated, files with the 'schg' flag cannot be modified.
To unlock the system, reboot in single user mode and run /root/unlock.sh
11. BEYOND VPN
___________________________________________________________
___________________________________________________________
As I already said in my last article about an OpenBSD VPN gateway, the following
problems remain :
1 - once our traffic goes out of the VPN tunnel, it becomes again visible (even if it cannot be linked to us)
2 - our browser can still be used against us to track what we done
3 - our emails can still be read by automated surveillance tools
4 - our searches on search engines like Google are read and stored
I invite you to read what I had to say back then, with the solutions I talked about.
I want to add that the search engine Duckduckgo has greatly improved since my last article, I use it exclusively and do not miss Google search at all. Give it a try. Also, last time I mentionned the Lavaboom encrypted email service, where your inbox is encrypted on your computer before being synchronised to the remote server. Since then, I was able to try a similar service, also in BETA, ProtonMail. For now it is very minimalist, you cannot for instance create labels or folders to class your emails :

It is very easy to use, no browser plugin required. You first provide your credentials to the server, only used to authenticate you, then locally your browser requests your encryption password. Thus you have one login and two passwords, and the second (private) password is never sent to the remote server. If you disconnect and reconnect on another computer and browser, it works. I mention this point because Lavaboom for the time being can only be used from one computer/browser, as per their FAQ, but they foresee to open it to multiple devices in the future. ProtonMail has 250 000 users as of August 2014, but is still in BETA and you can only subscribe to be set in a waiting list (which can take a long time).
Finally, I want to mention mobile phone security. If you subscribe to a VPN provider also compatible with iOS/Android, like AirVPN for instance, you can use your yearly subscription also on your phone by installing OpenVPN, with no additional cost. This way your browsing will also be protected on your phone (although not your phone calls and texts, but that will be the subject of another article).
CONCLUSION :
___________________________________________________________
___________________________________________________________
With this simple VPN gateway, you are starting to protect your privacy, bravo :

A FreeBSD box masquerading as OpenBSD, don't tell anyone !
Having the VPN done externally, not on your computer, offers many advantages :
- it cannot be disabled by a malware on your computer
- it protects you at boot time and when opening your session
- it works for any Operating System
- it works for devices which are not VPN-capable
- it protects your whole LAN not just one computer
- if you format and install another OS on your client computer, you don't have to reinstall the VPN
- it is optimized, as a dedicated hardware fully works on that task
- it creates a DMZ, if you connect anything directly on your ISP router, behind the FreeBSD router
- if there is a backdoor on your ISP router, it cannot be used to reach your LAN.
This article has allowed us to overview many ways to harden FreeBSD's default security : users restrictions, memory protection, restricted SSH access with an Elliptic Curve 256bits key, encrypted swap with AES 128bits, chrooted DHCP, DNS cache and encryption, randomness in the network stack (IP ID and TCP ID) and in processes ID, traffic normalisation, and raising securelevel to make some parts of the system unmodifiable (even by root). We also saw how to install binary packages or build them from sources, and how to use partitions labels.

However protecting our privacy goes beyond using a VPN. Your mobile phone for instance is another powerful tracking and spying tool, that a VPN cannot address alone. I hope to talk about that subject in a future article.
Privacy is more than ever challenged, as it has turned into a currency to access "free" services. We are not criminals, we have nothing to hide, except our privacy.

A FreeBSD box masquerading as OpenBSD, don't tell anyone !
Having the VPN done externally, not on your computer, offers many advantages :
- it cannot be disabled by a malware on your computer
- it protects you at boot time and when opening your session
- it works for any Operating System
- it works for devices which are not VPN-capable
- it protects your whole LAN not just one computer
- if you format and install another OS on your client computer, you don't have to reinstall the VPN
- it is optimized, as a dedicated hardware fully works on that task
- it creates a DMZ, if you connect anything directly on your ISP router, behind the FreeBSD router
- if there is a backdoor on your ISP router, it cannot be used to reach your LAN.
This article has allowed us to overview many ways to harden FreeBSD's default security : users restrictions, memory protection, restricted SSH access with an Elliptic Curve 256bits key, encrypted swap with AES 128bits, chrooted DHCP, DNS cache and encryption, randomness in the network stack (IP ID and TCP ID) and in processes ID, traffic normalisation, and raising securelevel to make some parts of the system unmodifiable (even by root). We also saw how to install binary packages or build them from sources, and how to use partitions labels.
However protecting our privacy goes beyond using a VPN. Your mobile phone for instance is another powerful tracking and spying tool, that a VPN cannot address alone. I hope to talk about that subject in a future article.
Privacy is more than ever challenged, as it has turned into a currency to access "free" services. We are not criminals, we have nothing to hide, except our privacy.
CHANGELOG
___________________________________________________________
___________________________________________________________
Updated 2015 January 04 :
- OpenVPN : chroot added, login/password text file removed
- Securelevel moved from /etc/sysctl.conf to /etc/rc.conf to avoid boot issues
- Changelog section added
- OpenVPN : chroot added, login/password text file removed
- Securelevel moved from /etc/sysctl.conf to /etc/rc.conf to avoid boot issues
- Changelog section added
LINKS
___________________________________________________________
___________________________________________________________
http://www.nostarch.com/
https://www.tiltedwindmillpress.com
http://www.freebsd.org/
https://airvpn.org
http://whoer.net/
https://www.lavaboom.com
https://protonmail.ch
https://duckduckgo.com/
 Follow me @gkweb76
https://www.tiltedwindmillpress.com
http://www.freebsd.org/
https://airvpn.org
http://whoer.net/
https://www.lavaboom.com
https://protonmail.ch
https://duckduckgo.com/
FYI, regarding using Windows, putty ( the ssh client ) does not yet support ECDSA/ED25519 keys, hence applications that rely on its plink/pageant will fail, some example might be FileZilla and WinSCP.
ReplyDeleteHi,
ReplyDeleteFirst of all thank you very much for this great article.
Could you please tell me if I still need to do the FSTAB steps if my system has ZFS file system?
Also, can this tutorial be applied inside a FreeBSD jail or is it best to have it in the FreeBSD host?
Thank you in advance for your reply :)
Tony
Hello,
DeleteThe fstab steps are not mandatory, the router can be done without it. Also I do not know ZFS enough so I cannot answer that point. The router on the article is done without jails, but should be jail compatible. For instance it may be possible to install OpenVPN and DNSCrypt on one or two jails, although I never tried it yet. DHCP server could be a candidate too.
When upgrading my router to FreeBSD 10.1-RELEASE I may try to play with that.
Regards,
Guillaume
Hello,
ReplyDeletejust for my question about dnscrypt-proxy for local network, I have found out, that if I add these into my unbound.conf it works like charm:
local-zone: "mydomain." static
local-data: "LittleDevil.mydomain. IN A 192.168.211.10"
local-data-ptr: "192.168.211.11" LittleDevil.mydomain"
Thank you,
Regards,
Petr Sourek
Salut Guillaume!
ReplyDeleteGreat article!!! Too bad VPN is not optional. Can I just simply carve it out and keep the other great stuff ? Merci et meilleures salutations!